
If you’re new to bicycle maintenance or simply don’t know How to Find Master Link on Bicycle Chain, this guide will help you. The first thing you need to do is identify which type of chain your bike has. There are two common types of chains: derailleur and BMX.
A derailleur chain will have a master link that can be removed without tools, while a BMX chain will require a special tool to remove the link. Once you’ve identified the type of chain, locating the master link is relatively easy. On a derailleur chain, the master link is usually located near the end of the chain.
It’s often silver in color and may have a small logo on it. For a BMX chain, the master link is typically located in the middle of the chain. Again, it’s often silver in color but may also be black or another color depending on the brand.
Bicycle Chain Master Links: Tips & Tricks KMC Shimano SRAM
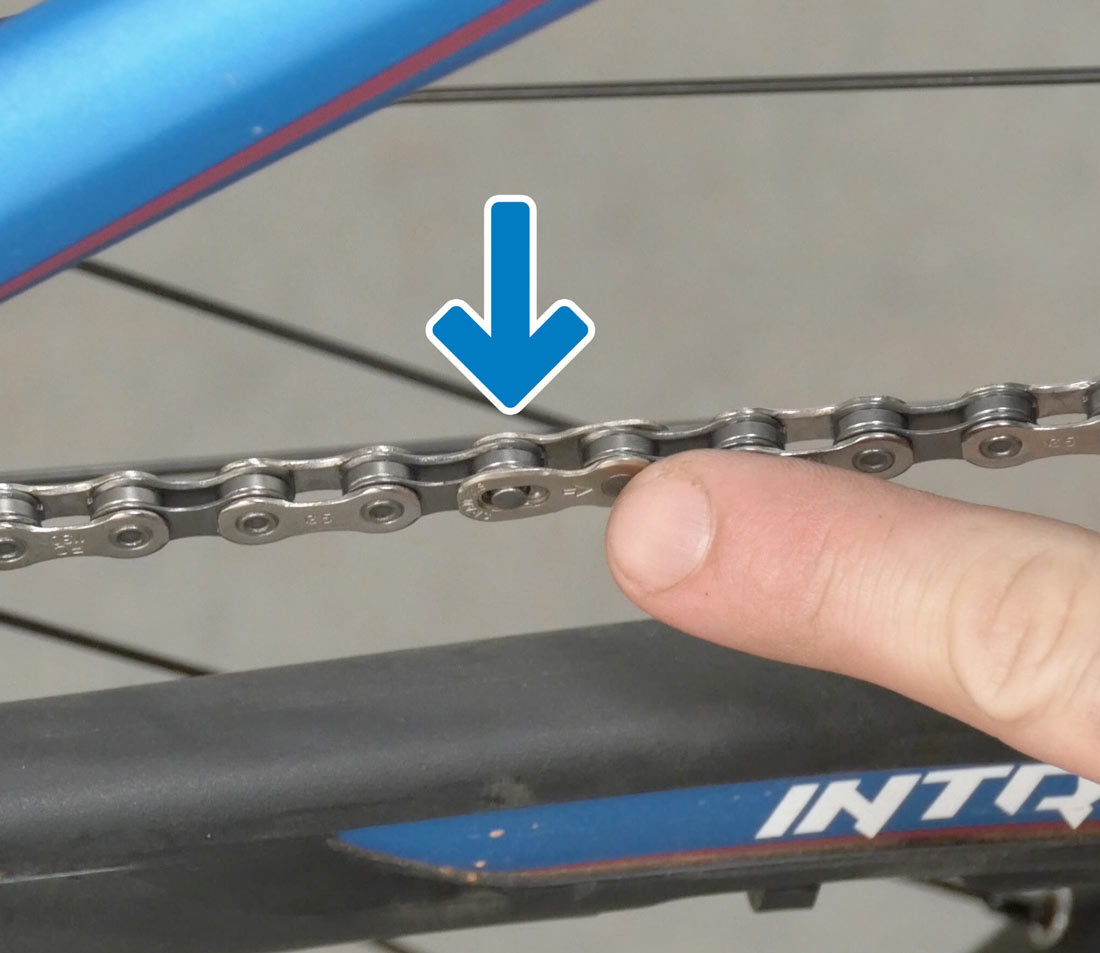
- Look for a small metal connector between two links on the chain
- This is the master link
- If the chain does not have a master link, you will need to use a chain tool to remove one of the links
- Insert the chain tool into one of the side plates of the link you want to remove
- Push or pedal until the pin is pushed out far enough to remove the link plate
- Repeat this process on the other side plate and then remove the link from the chain
Can’t Find Master Link on Bike Chain
“Why can’t I find my master link?” This is a question we hear a lot at the shop. And it’s usually accompanied by a lot of frustration.
Here’s the thing- your chain has to have some slack in order for the master link to be installed. Most people don’t realize this and spend way too much time yanking on their chain trying to get the link in place. The best way to check for proper slackness is to put the chain around your largest cog and pull up on it until there’s about an inch or so of space between the bottom of the chain and the top of the cog.
If you can do that, then you have enough slack.
If you’re still having trouble, bring your bike into the shop and we’ll be happy to help you out!
Remove Bike Chain Without Tool Master Link
If you’re a cyclist, sooner or later you’re going to have to remove your bike chain. Maybe you’re doing some routine maintenance, maybe you’re replacing a worn-out chain, or maybe you’re just trying to clean up a messy one. In any case, removing a bike chain is not difficult, but it does require a few tools.
The first step is to remove the master link. The master link is the link that holds the two ends of the chain together. It’s also the weakest link in the chain, so it’s likely to be the first one to fail.
To remove it, simply unscrew it with a pair of pliers or an Allen wrench (the size will depend on your particular master link). With the master link removed, the rest of the process is relatively straightforward. Next, use a chain breaker tool to push out one of the pins that hold each individual link together.
Once that pin is out, the links will come apart easily and you can pull the chain through whichever opening in your frame best suits your needs (front derailleur for most people). When reassembling your new or cleaned chain, simply line up all of the links and push in a new pin with your chain breaker tool. Make sure that this pin is seated properly before riding; otherwise, your chain could come apart while you’re pedaling along!
Bicycle Chain Master Link
If you have ever worked on a bicycle, you know that the chain is one of the most important parts. It is what transfers the power from the pedals to the wheels and makes your bike go. The chain is also one of the most delicate parts of the bike and can easily become damaged or even broken if not properly maintained.
The master link is what keeps your chain together and is an important part of its overall strength and durability. Without a strong master link, your chain could come apart while you are riding, which could cause serious injury. There are two types of master links: riveted and quick release.
Riveted master links are permanent and cannot be removed without damaging the link itself. Quick release master links can be removed without damage, making them ideal for easy maintenance and repair. To remove a quick release master link, first, loosen the bolts that hold it in place with a wrench.
Then, use a pair of needle-nose pliers to gently pull out the retaining clip. Be careful not to lose this clip! With the clip removed, you should be able to slide the master link out by hand.
Installing a new quick release master link is just as easy. Start by threading one end of the chain through the frame of your bicycle so that it comes out on the other side. Then, take the new master link and insert it into place, making sure that the “teeth” on each side are aligned correctly.
Bike Chain Master Link Removal
If you’re like most cyclists, you probably don’t give your bike chain much thought – that is until it needs to be cleaned or repaired. And one of the most common repair tasks is removing a master link. In this post, we’ll show you how to remove a master link from your bike chain using two simple tools: a chain breaker and an adjustable wrench.
First, start by shifting your bike into the smallest cog on the rear cassette. This will give you more slack in the chain and make it easier to work with. Next, use the chain breaker to push out one of the pins that hold the master link together.
If your master link has two pins, only remove one at this time. With one pin removed, slide the master link off of one side of the chain. You may need to use the adjustable wrench to loosen up the other side of the link before it will come off easily.
Once the master link is removed, clean any dirt or grime from inside both halves of the link before reassembling them. To put everything back together, simply line up both halves of the master link and push in both pins until they are flush with each side of the link. Make sure not to overtighten either pin – just snug them up so they’re secure but can still rotate freely within their respective holes.
That’s all there is to it! Now you know how to remove and reinstall a bicycle chain master link – an essential skill for any cyclist who likes to do their own maintenance and repairs.
Do All Bicycle Chains Have a Master Link
Most bicycle chains have a master link, which allows the chain to be removed without tools. The master link is also called a connecting link. It consists of two side plates held together by a pin or rivet.
One side plate has a protruding lip that fits into a groove on the other side plate. This holds the link together and keeps it from coming apart. There are two types of master links: those with a removable pin and those with a riveted pin.
Removable pin master links are easier to remove and install, but they can come loose over time. Riveted pin links are more permanent, but can be difficult to remove if you don’t have the right tools. Most new chains come with a removable master link.
If your chain doesn’t have a master link, you’ll need to use a chain tool to remove it. To do this, first, loosen the bolts that hold the rear wheel in place. Then remove the wheel and tire from the frame.
Next, use the chain tool to push out one of the pins that connect two links in the chain (this is called “breaking” the chain). Once the pin is out, you can slide the links apart and remove the chain from your bike.
Bicycle Chain Master Link Size
Chains come in many sizes, but the most common are 1/2″ x 3/32″ and 1/2″ x 1/8″. The first number is the width of the chain, while the second number is the width of the inner plates. Most modern bicycles use a 1/2″ x 3/32″ chain, as this size provides a good balance between strength and weight.
The vast majority of bicycle chains use what’s called a master link. This is a special link that can be opened and closed without the need for any tools. Master links come in two varieties: those with pins, and those without.
Pins-and-clips master links have two small pins that must be aligned in order to open or close the link. These types of master links are generally considered to be more secure, as it’s more difficult for them to accidentally come apart. Non-pinned master links don’t have any moving parts, which makes them easier to open and close but also slightly less secure.
When choosing a master link, it’s important to make sure that it’s compatible with your chain. Most manufacturers will sell master links that are specific to their chains, so it’s usually best to stick with the same brand. Additionally, you’ll need to make sure that you get the right size link – typically either 1/2″ or 9/16″.
Once you’ve got your new master link, simply thread it onto one end of your chain (it doesn’t matter which end) and then connect the two ends together. You may need to use a pair of needle nose pliers to help push the pins through if your link has them. And that’s it!
Your chain is now connected using a master link and is ready to ride.
Chain Master Link Types
There are four types of chain master links: riveted, clip, press fit, and lockring.
Riveted master links have two plates that are held together by rivets. This type of master link is the strongest, but it can be difficult to remove if you don’t have the right tools.
Clip master links have a plate with a clip that holds it in place. These are easier to remove than riveted master links, but they’re not as strong. Press fit master links have a plate that fits into a groove on the other plate.
These are easy to remove and install, but they’re not as strong as riveted or clip master links. Lockring master links have a ring that locks the two plates together. These are the easiest to remove and install, but they’re also the weakest type of master link.
Credit: www.parktool.com
Is There a Master Link on All Bike Chains?
While all bike chains will have some kind of master link, the specific implementation can vary between manufacturers. Shimano and SRAM use different designs, so it’s important to check your chain compatibility before purchasing a new one. Some aftermarket chains also use a different standard, so it’s best to consult with your bike mechanic to be sure.
In general, however, most bike chains will have some kind of master link that allows for easy removal and installation.
How Do You Take off a Bike Chain Without a Master Link?
Assuming you don’t have a master link: 1. Place the chain on the big ring in front and the small ring in the back. 2. Find a link where the pin is sticking out further on one side than the other.
This is your starting point. 3. Insert a chain tool into that pin and unscrew it about halfway. You want to be able to see threads on both sides of the now-loosened pin.
4 If everything looks good so far, finish unscrewing the pin until it falls out of one side of the link altogether. The two outer plates of that link are now free to move, but are still held together by the inner plate (to which those pins go). 5 Grasp those two outer plates firmly and pull them apart until they come free of the inner plate completely, exposing an empty space where that inner plate used to be—the master link!
Do Old Bike Chains Have a Master Link?
A chain is made up of alternating inner and outer plates. Held together with rivets, these create the basic structure of the chain. Each link has two side plates, an inner plate, and an outer plate.
Between each pair of side plates are pins and bushings that hold everything together and allow the chain to flex as you ride. At one end of the chain, there is a master link. The master link does not have any rivets holding it together like the rest of the links in your chain.
Instead, it has a special “offset” design that allows one half of the master link to be removed without having to break the chain apart. This is what allows you to remove and install a new chain without having to use any special tools. The other half of the master link snaps into place, locking everything together again.
Most old bike chains will have a master link, although some may have been joined using a rivet instead. If your bike’s chain does not have a master link, then you will need to use a rivet tool in order to join or remove it from your bike (this process is also known as “ripping out”).
What is a Master Link Bike Chain?
A chain is only as strong as its weakest link, and when it comes to bike chains, that weak link is the master link. The master link is the removable link that connects the two ends of a chain together. Unlike other links on a chain, which are held together by rivets, the master link can be removed without damaging the rest of the chain.
This makes it ideal for repairing or replacing a damaged chain. The most common type of master link is the clip-style, which consists of two half-links that are connected by a small pin. To remove a clip-style master link, simply push out the pin with a small screwdriver or nail file.
Once the pin is removed, the two halves of the master link can be pulled apart. Some Clip-style master links also have an additional safety feature in the form of a retaining ring that prevents the pin from coming out unintentionally. Another type of master link is the press-fit style, which uses interlocking teeth instead of a pin to hold the two halves together.
Press-fit style master links are generally considered to be stronger and more durable than clip-style links, but they can be more difficult to remove if you do have the right tools. To remove a press-fit style master link, you’ll need either a chain tool or pliers that can grip both sides of the link at once. Once you have a firm grip on both sides of the press-fit master link, push or pull them in opposite directions until they pop apart.
Conclusion
If you’re looking to find the master link on your bicycle chain, there are a few things you’ll need to do. First, you’ll need to identify which type of chain your bike has. There are two types of chains – derailleur and hub.
Derailleur chains have a master link that is removable, while hub chains do not.
Once you’ve identified the type of chain your bike has, you’ll need to remove the chain from the bike. To do this, you’ll need to loosen the bolts that hold the chain in place.
Once these are loosened, you can slide the chain off of the bike.
If you have a derailleur chain, the master link will be located near one end of the chain. It will be slightly larger than the other links on the chain and will have a small notch in it.
If you have a hub chain, there is no master link – all of the links are permanently connected.
Once you’ve located the master link, you can remove it by gently pushing on one side while pulling on the other side. This will release the link and allow you to take it off of the chain.