
One of the most important aspects of riding a dirt bike is having the proper tires. This means that they need to be properly inflated and have the right tread for the terrain you’ll be riding on. If you’re not sure about How to Stud a Dirt Bike Tire, don’t worry – it’s actually quite simple.
In this article, we’ll show you how to stud a dirt bike tire in just a few easy steps.
- If you are unsure of the size of studs you need, take your dirt bike to a local tire shop and have them measure the width of your tire
- Purchase the correct size studs for your tires
- Remove the old tire from your dirt bike
- Clean the rim of the dirt bike wheel with soap and water to remove any debris or grime that could prevent the new tire from seating properly on the wheel
- Place the new tire on the Wheel, being careful not to pinch or damage the tube in between the bead of the tire and the rim of the wheel 6 Inflatethe new tire until it is just firm enough to hold its shape, but not so much that it becomes difficult to work with 7 Using a stud gun, insert studs into pre-drilled holes around the perimeter of 8 Once all studs are in place, inflate the tire to its recommended pressure
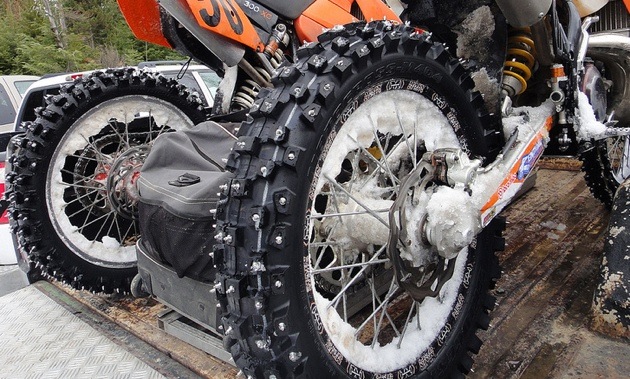
Studded Mx Tire
If you’re looking for a tire that can provide good traction in a variety of conditions, you may want to consider a studded MX tire. These tires are equipped with metal studs that can help provide a better grip on slippery surfaces. One thing to keep in mind is that studded tires can be quite loud, so if you’re planning on using them on your street bike, be prepared for some extra noise.
Additionally, the studs can wear down over time and will need to be replaced periodically. Overall, studded MX tires can be a great option if you need extra traction in challenging riding conditions. Just be aware of the potential downsides before making your purchase.
Tire Studs
Tire studs are small metal pins that are screwed into the tread of a tire. They provide extra traction on icy or snowy roads. Although they can be added to any type of tire, they are most commonly used on studded winter tires.
Adding tire studs is a fairly simple process. First, the tire must be clean and free of any debris. Next, special screws designed for attaching studs to tires are screwed into the tread.
The number of studs that can be added depends on the size and width of the tire, but most tires can accommodate between 50 and 100 studs. Tire studs can significantly improve traction on slippery roads, but they come with some trade-offs. First, they can damage pavement, particularly when it’s cold enough that the pavement is brittle.
Second, they can make noise as they contact the road surface. And finally, they wear down quickly if used on dry roads or pavement without snow or ice present – so it’s important to remove them before driving on bare roads again (or you’ll end up with bald spots on your tires!).
Kold Kutter
Kold Kutter is a revolutionary new product that promises to keep your food and drinks cold for hours on end. It’s simple to use – just freeze the Kold Kutter discs overnight, then pop them into your fridge or cooler before you head out for the day. No more ice packs or soggy sandwiches!
So how does it work? The discs are made of a special material that absorbs heat, so when they’re placed in your fridge or cooler, they help keep things nice and cool. Plus, the discs can be re-frozen and used over and over again, so you’ll always have cold backups on hand.
Whether you’re headed to the beach, picnicking in the park, or packing lunch for work, Kold Kutter is a must-have solution for keeping your food and drinks chilled all day long. Give it a try – your taste buds will thank you!
How to Make Ice Tires
When the weather outside is frightful, but you still need to get around, consider making your own ice tires. This is a great option if you live in an area with frequent snow and ice storms, or if you are planning to travel in winter conditions. Ice tires can provide better traction and stability on icy roads than regular tires, and they are relatively easy to make at home.
Here’s how: 1. Start by inflating your tires to the maximum pressure recommended by the manufacturer. This will help prevent the tire from becoming too soft when it comes into contact with cold temperatures.
2. Next, apply a layer of rubberized fabric tape around the circumference of each tire. This will create a barrier between the tire and the ice, helping to prevent slipping and sliding.
3. Once the tape is in place, use a garden hose to spray water over each tire until it is completely coated. The water should freeze quickly in contact with the cold temperature of the tire, creating a thick layer of ice that will add weight and traction.
4. Finally, drive slowly and carefully until you reach your destination!
Motorcycle Ice Racing
Ice racing is a type of motorcycle racing that takes place on a frozen lake or track. It is a relatively new sport, with the first official ice race taking place in Sweden in 1963. Ice racing requires specialized equipment, including motorcycles with studded tires and riders wearing spiked boots.
The bikes are typically lightweight and have the low horsepower to reduce their weight on the ice. Races are held over a short distance, typically around 1-2 km, and last for just a few minutes. Because of the slippery conditions, there is often a lot of crashing in ice racing!
If you’re looking for an adrenalin-fuelled motorcycle racing experience, then ice racing could be for you. It’s a fast and furious sport that will test your riding skills to the limit.
Credit: riderswestmag.com
How Do You Put Studs on a Dirt Bike?
If you’re new to dirt biking, one of the first things you’ll need to learn is how to put studs in your tires. This process is fairly simple and only requires a few tools. First, you’ll need to purchase studs that are the correct size for your tires.
Next, using a drill or power screwdriver, create pilot holes in your tire at the desired locations for the studs. Finally, insert the studs into the holes and secure them with nuts or washers.
Some riders choose to put studs in all four of their tires, while others only use them on the front or rear tires.
It’s up to you to decide how many and which ones you’d like to use. Just keep in mind that adding more studs will provide better traction but may also make your ride more uncomfortable due to increased vibration.
How Do You Put Studs in a Motorcycle Tire?
If you’re looking to add a little bit of personality to your motorcycle, or if you simply want to change up the look of your ride, adding studs to your tires is a great way to do it. But before you start screwing in studs willy-nilly, there are a few things you need to know. First, it’s important to choose the right studs for your tires.
There are two main types of studs: those that screw into the tire (screw-in studs) and those that push into the tire (push-in studs). The type of stud you choose will depend on the type of tire you have. For example, if you have an aluminum alloy wheel, you’ll want to use push-in studs so as not to damage the wheel.
Once you’ve chosen the right type of stud for your tires, it’s time to start installing them. If you’re using screw-in studs, simply screw them into the tread of the tire using a hand drill or power drill. If you’re using push-in studs, first make a small hole in the tread with a nail or other sharp object, then insert the stud into the hole and tap it into place with a hammer.
Whichever type of stud you’re using, be sure not to install too many in one spot as this could cause uneven wear on your tire. Also, be sure to check with your local DMV before hitting the road with your newly Studded Tires – some states have laws limiting how many Studded Tires can be used on public roads!
Can You Stud Any Bike Tire?
There are a few things to consider when studying a bike tire. First, is the type of terrain you’ll be riding on. If you’re mostly riding on packed snow or ice, then a tire with metal studs may not be necessary.
However, if you’re riding on loose snow or ungroomed trails, then studded tires will provide better traction and safety. The second is the size of your tire. Studded tires are available in a range of sizes, from 26″ to 29″.
Choose the right size for your bike to ensure proper fitment and performance. Third, is the number of studs you need. This will depend on the width of your tire and how much traction you want.
A wider tire will require more studs for stability, while a narrower tire can get by with fewer studs. Lastly, consider the weight of your bike when choosing studded tires. Heavier bikes will need stronger tires with more studs for stability and durability.
Follow these tips and you’ll be able to choose the best studded bike tires for your needs!
Can You Take Studs Out of Dirt Bike Tires?
Dirt bike tires are designed to provide grip and traction on a variety of surfaces, including loose dirt, mud, and sand. They typically have deep tread patterns with large knobs or lugs that can dig into the ground for added grip. Some dirt bike tires also have special features like reinforced sidewalls or puncture-resistant construction.
In general, it’s not recommended to remove studs from dirt bike tires. Doing so can reduce the tire’s ability to grip the ground, especially in slippery conditions. It can also make the tire more susceptible to punctures and other damage.
If you do decide to remove studs from your dirt bike tires, be sure to inspect the tires carefully before riding and replace them if they show any signs of wear or damage.
How to Stud your Dirt Bike TIRES!
Conclusion
If you’re looking to stud your dirt bike tires, there are a few things you need to know. First, you’ll need to purchase the right size studs for your tires. Second, you’ll need to properly clean and prepare the surface of your tire before applying the studs.
Third, you’ll need to apply the studs in a pattern that will ensure proper grip and traction on all surfaces. fourth, once the studs are in place, be sure to check them regularly to ensure they are tight and not coming loose.